Konqueror is not only a web browser but also a good file manager designed as a core part of the K Desktop Environment. To be released under the GNU General Public License, Konqueror can run on many different operating systems including Ubuntu Linux. However, you can install this application easily in Ubuntu if you are missing it.

sudo apt-get install konqueror
What I would like to tell you in this article are the hidden features of this great application.
1. As a Web browser, Konqueror allows you to navigate easily a web site with access keys. You try to open a site with Konqueror, hit Ctrl key to activate access keys and you will see a bunch of boxed characters appear. Type any character you like to navigate the link.
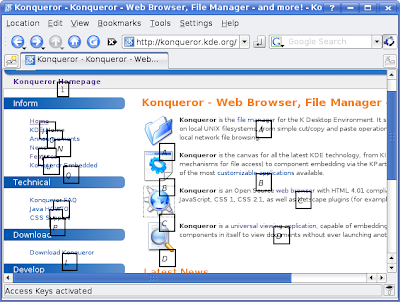

2. You can access new websites in new tabs when calling Konqueror externally. For example, I want to open the website: www.kde.org, then I use this command.
kfmclient newTab http://www.kde.org
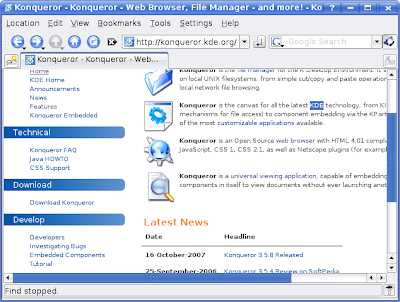
3. Konqueror let you search text quickly using find as you type. For example, I want to search for "KDE" in the current web page, just hit "/" key and start typing "KDE".

You can hit F3 to go to the next result.

4.
Another score for Konqueror is the bookmark toolbar with a “View Most Visited” feature found under the View menu.

5. It's possible to scroll up or down with the auto-scroll feature of Konqueror. Just hold Shift key then press Up or Down key. Hit Shift key again to stop scrolling.

6. Like Firefox, you can use Ctrl + T to open a new tab in Konqueror.

7. As a file viewer, Konqueror allows you to view any file or folder in your file system. Just enter the path to your folder into location bar. For example, enter
/home/vntutor

8. Easily access the file system of any computer which is running a SSH daemon. For example, to access the files of linux.com as user vntutor, enter into location bar:
fish://vntutor@linux.com
9. Easily access the file system of any computer which is running a FTP service. For example, to access the files of linux.com as user vntutor , enter into location bar:
ftp://vntutor@linux.com
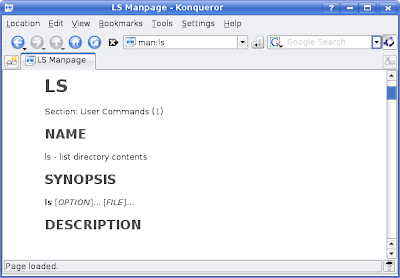
10. As a terminal window, Konqueror allows you to read nicely formatted man pages. For example, I want to the ls man page, I have to enter this command to the location bar.
man:ls
Read more!

As you know the Windows operating system allows application programs to access to system files. This makes viruses spread over the whole system easily to do damage on your system. Linux is strict with its permissions. A virus cannot gain the necessary privileges to destroy your system unless you want to do as a super user. In order words, your system files are protected at the high level. That is the reason why most of Linux users don't need a virus protection. So, I wonder that do we need an anti-virus for our Ubuntu box?

In my opinion, the most valuable resource is your data. Hence, it need to be protected as well. Indeed, I always lock the door before I leave my house. Do you think that Linux viruses are coming? So, this tutorial will guide you how to install a Virus Scanner to protect your data. This installation can be applied for both Ubuntu and Kubuntu Gutsy.

Step 1: Install a Virus Scanner

sudo apt-get install clamtk
Sep 2: Start up the tool (read more details about this tool here)
clamtk
Step 3: Open a file or a folder to scan

Read more!

KDE 4.0's release event has ended finally last month (January 2008). KDE 4.0 is ready and now available to download. Get it here. In this post, you will be introduced several useful resources to know about KDE and new features in KDE 4.0.

Firstly, I will show you two ways to check the current of your KDE. You should check this before upgrading to a new version.

  • Graphical method: open Konqueror and look at what's written in "About"
  • Command method: run this command in your terminal
    kded --version
Now, you can follows a screenshots tour with 50 nice pictures to know what is new in KDE 4.0. Then, this tutorial will tell you how to install KDE 4 in Kbuntu Gutsy. If you want to know more details of this release please watch "KDE 4.0 Release Event Keynote" below.


KDE users are experting for the release schedule of KDE 4.1 as follows:
  • March 31st, 2008: Soft Feature Freeze
  • April 22nd, 2008: Hard Feature Freeze
  • April 22nd, 2008: Tag KDE 4.1 Alpha 1
  • April 29th, 2008: Release KDE 4.1 Alpha 1
  • May 20th, 2008: Message Freeze
  • May 20th, 2008: Tag KDE 4.1 Beta 1
  • May 27th, 2008: Release KDE 4.1 Beta 1
  • June 17th, 2008: Tag KDE 4.1 Beta 2
  • June 24th, 2008: Release KDE 4.1 Beta 2
  • July 8th, 2008: Artwork Freeze
  • July 8th, 2008: Tag KDE 4.1 RC 1
  • July 15th, 2008: Release KDE 4.1 RC 1
  • July 22nd, 2008: Tag KDE 4.1.0
  • July 29th, 2008: Release KDE 4.1

Read more!

These days Ubuntu users are being offered various CD/DVD burners. In order words, to make a data CD is not a difficult work under Ubuntu. You can follow a short tutorial from Ubuntu Geek to know how to burn a CD by using GnomeBaker. WikiHow also has a post on this topic. In addition, I will provide another tutorial for burning a CD in Kubuntu Gutsy.

K3b is a default application in Kubuntu Gutsy. It allows you to burn CDs or DVDs with a comfortable user interface. To know more details of useful features please read at K3d websites. Now I will show you step-by-step to make a data CD by using this software.

Step 1: Start up the application
KMenu > Multimedia > K3D CD & DVD Burning
Step 2: Select your data which you want to write to CD
For example, I stored a photo album of my Barcelona trip last month in a folder. Now, I want to make a copy of all pictures. So I have to browse to that folder and press "Ctrl + A" to select all. Then drag and drop all selected files to the panel at the bottom. Put a name for my album (CD label). I have got a ready status for burning as the following picture.

Step 3: Open Burn dialog
You click "Burn" button (CD icon) to open a Burn dialog as the follows

Step 4: Insert a bank CD to CD/DVD drive
After the bank CD is put in
CD/DVD drive, the "Burn" dialog will automatically be changed

Step 5: Set up parameters for burning CD
You can change some default parameters for burning your CD. For example, I have changed the speed of burning (speed = 24x).

Step 6: Burning CD
Click on "Burn" button to start burning your data ....
Just wait for some minutes you will have a new data CD. This is also a good manner to backup your data to external storages.

Read more!

A logo is just a graphical element, a symbol, or sign. However, it plays an important role in the development of your business because it can help you form a trademark for your company. If you are a blogger or a webmaster, do you need a logo for your blog or your website? I think there is no reason to say NO if you also need to make a good trademark. Today I will show you how to make a professional and eye-catching logo at a leading online provider of logo design.


Now you go to the logo design website and click on "Try it Free" to make a new logo.

Step 1: First, choose your image
Images are grouped into three different groups (High-Tech, Bold, Flair). It depends on the objective, experiment, size and status of your company you can determine which group is the best one. However, if you can't select a final decision the Image Calculator can help you to determine whether your look should be High-Tech, Bold, or Flair by answering some questions.
In this tutorial, the first group is selected for VnTutor.

Step 2: Choose your industry category

Because my blog is a technical blog which provides Free Tips about Ubuntu Linux, I have selected "Computer + Internet" industry in the following table.

Step 3: Select a symbol you like
For example, I have selected one globe symbol to show on my logo.


Step 4: Enter a name and a short description for your logo

I have entered "VnTutor" into the first line in the input box located at the top-right conner. Then "Ubuntu Tips" is filled with another font into the second line of the input box. Now, I have obtained a result like this.

Step 5: Move elements to make a nice layout

Just click on the graphical items (e.g. your symbol, your name, or your description) to move to a proper positions to make a good layout. The remanding work is to customize your logo such as shape, color, and size. For example, look at my logo with strong colors in the following picture.

Now, click "Next" button to see your logo put in the different layout of business cards.

You can select any business card to see.

If you want to make a separate logo, just press "PrtSc" button to capture the current screen and use any graphics editor to cut your logo. However, if you need vector images in the high resolution you can pay for logo design company to get it easily.

Read more!

As I discussed in last post KWallet have offered a great way for Ubuntu users to remember all passwords of their applications which require the authorization. You can retrieve your passwords from the encrypted file via KWallet Manager application normally launched when KDE starts. You can manage that unless you forget your master password. But what should you do if you have forgotten the master password? That is also the topic I want to share today.

You will see an error dialog in the case you send a wrong master password to KWallet Manager.

It's impossible to view your passwords of other applications if you don't know what is your master password. Other words you can't login into the KWallet Manager to manage your wallets. To solve this problem you have to remove the configuration file stored in the application folder. But normally I prefer renaming the file name. For example, the following commands are done with vntutor user.

cd /home/vntutor/.kde/share/apps/kwallet/
mv kdewallet.kwl kdewallet.kwl.bk
A new configuration file named kdewallet.kwl will be created at the next time when you restart KDE. Please share with everybody here if you know a better way.

Read more!

Nowadays most of computer applications require an authorization before using (e.g. kopete, kmail, ..). It means that you have to remember many different passwords if you want to keep a high safe mode for both your personal information and your computer system. To manage all of them is not easy but to write them down is not secure. So what is a good solution for Ubuntu users in this case?

KDE users are offered an application named KWallet, which is used as the default
in Kubuntu to securely store passwords. By using this tool all your passwords are stored in a strongly encrypted file which is accessible by all your applications. However, to manage this file you have to define a master password which is required at the first time when you start up this tool. The master password is also used to encrypt all of the information stored inside the wallet. Therefore you don't need to remember all your passwords except the master one. Another benefit which is offered from this tool is that you can save time for entering user names and password every time you start up your applications.


All wallets are managed by kwalletmanager. This program keeps various wallets for any kind of data. You can operate with defined wallets via this program. Currently I'm using this tool to remember for my applications in Ubuntu Gutsy 7.10. How about you?

Read more!

If you are relatively new to the internet marking, the first thing you should do is to own a good domain name for your business. Why do you need a good domain name? It's easy to answer this question because a good domain plays a very important role for advertising your products or your trademark successfully. Here are few things to consider for selecting a domain name.
Nowadays, there are thousands of domain name providers on the worldwide. That is a good chance for users to select a proper service. So, don't pay too much for a single domain name. For example, you can make a domain registration with a price $10.34 per year from paylessdomains site. To buy a domain, you just enter your domain name in the search box, select the extensions of your domain (.com, .net and .org suggested), and click submit button. Then, take any you like from the list and check out. The following picture shows the way that I have done to search linux4free domain.

Read more!

Do you agree with me that Kpdf is the best tool in top 5 PDF readers? At the point in time when I am writing this post, the current version is Kpdf 0.5.8. You can read here to see what are new features of this version. I think that I should write some small tips for this tool. But I will do it latter. Now I will blog for how to change a default PDF reader.

Yesterday, I have installed all tools in top 5 PDF readers. Now, I try to double-click on a PDF document, it is shown up in Acrobat Reader. That means Acrobat Reader is set as the default PDF viewing program in my computer. I don't want to remove them right now. May be I will make another comparison next time. But I prefer Kpdf, so it should be the default one. To make it as the default PDF viewing program I have carried out the following steps in both Ubuntu and Kubuntu.


In Ubuntu Gutsy 7.10.

  • Right-click on the PDF document
  • Select Properties
  • Open With" tab
  • Select KPDF option from the list (see the picture)


  • Click "Close" button to finish
In Kubuntu Gutsy 7.10.
  • Right-click on the PDF document (or use Alt + Enter)
  • Select Properties
  • Click on "Tool" button at the right side of "Properties" window
  • Move Kpdf to the top of the list of available tools in "Application Preference Order" panel, the result looks like the following picture

  • Click "Apply" and "OK" then to confirm changes
  • Try to double-click on a PDF document again ... It's OK!

Read more!