 As you know, xorg.conf is a X window system server configuration file. This configuration file is searched for in /etc/X11 folder when X server is stared. It allows you to configure your screens and graphics divers.
With previous versions of the Ubuntu Linux, you have to modify this file manually. This is a problem for beginners who don't understand how to edit the content of the file in correct syntaxes. For an IT person, he also worries about that because if he makes any mistakes, the X server can be broken. So, that should be nice if he make a copy of this file before changing some parameters there. Like this
sudo cp /etc/X11/xorg.conf /etc/X11/xorg.conf_backup
Now, you can do it in Ubuntu 7.10 (Gutsy Gibbon) with the support of a graphical user interface. This tool makes the configuration of X Window easier.
To open this tool, you select System > Administration > Screens and Graphics Then, you can select your graphics card and a right resolution of your screen. The configuration file xorg.conf will be updated automatically after you click "OK" button on this tool. Ubuntu Linux is better and better.
Configurating Screen and Graphics in Ubuntu Gutsy
10:32 PM | Customising, Tips - Tutorials, Ubuntu Gutsy | 2 comments » If your computer system is booting slowly or your splash screen is not shown it could be that usplash has created a splash screen incorrectly. This tip will show you how to remove incorrect resolution in Grub configuration file to improve your booting performance.
For example: if you know the color is 64K and the resolution is 1024x768, you will get a value of 791 for VGA.
#           +--------------------------------------------+
#           | 640x480    800x600    1024x768   1280x1024
#     ------+--------------------------------------------+
#      256  |   769       771         773         775    |
#      32K  |   784       787         790         793    |
#      64K  |   785       788         791         794    |
#      16M  |   786       789         792         795    |
# +--------------------------------------------------+sudo gedit /boot/grub/menu.lst
kernel /boot/vmlinuz-2.6.22-14-generic root=UUID=bc93b5ac-7bfa-4dc6-a121-efffdae0057a ro vga=792 splash
# Usplash configuration file
xres=1024
yres=768uname -r
The result looks like this
2.6.22-14-genericsudo update-initramfs -u -k 2.6.22-14-generic
Play DVD and Listen to MP3 Music in Gutsy Gibbon
7:17 PM | Installation, Multimedia - Video, Troubleshooting, Ubuntu Gutsy | 0 comments » Have you already installed Ubuntu 7.10 (Gutsy Gibbon) ? If not, you should read this post to know how to install a new Ubuntu Gutsy.
Okey! If Ubuntu Gutsy is available, you can follow the following steps to setup extra packages to play DVD and listen to MP3 music.
What packages you have to install are non-free multimedia codecs known as w32codecs and libdvdcss2sudo gedit /etc/apt/sources.list
deb http://packages.medibuntu.org/ gutsy free non-free
You can use the following command to do both step 1 and 2:echo "deb http://packages.medibuntu.org/ gutsy free non-free" | sudo tee -a /etc/apt/sources.list
wget -q http://packages.medibuntu.org/medibuntu-key.gpg -O- | sudo apt-key add -
sudo apt-get update
sudo apt-get install libdvdcss2
sudo apt-get install w32codecs
Blank Screen on Bootup and Shutdown Ubuntu Gutsy
8:48 PM | Kubuntu Gutsy, Troubleshooting, Tweaks | 7 comments » There is no monitor signal while booting Ubuntu Gutsy. Just only a bank screen during booting the system. This problem is also seen again after you shutdown the Ubuntu Gutsy. How can you fix this problem? Don't worry! Hopefully, this post can help you to solve the problem.
First, you should install a startup manager. This tool allows you to change settings in the bootloader and splash screen in Ubuntu Gutsy. Run the following line in your terminal to install this tool.sudo aptitude install startupmanager
Then, you start up this tool as a root usersudo startupmanager
You will see a Startup-Manager window like this Look at the bottom of the window, you have marked all options (Show bootloader menu, Show boot splash, and Show text during boot) like the following picture.
Click "Close" and continue to next step.
You open the usplash configuration filesudo gedit /etc/usplash.conf
Maybe, the content of your configuration file like this # Usplash configuration file
xres=1280
yres=1024
You change the resolution in this file to # Usplash configuration file
xres=800
yres=600
Save file and reboot your Ubuntu box to see the effect. What is your result?
 Gutsy Gibbon released today!
You can download Gutsy Gibbon from Ubuntu site or Ubuntu mirrors. An Ubuntu 7.10 Gutsy torrent can be downloaded directly here. However, if you are using Ubuntu 7.04 ("Feisty Fawn"), you can upgrade to Ubuntu 7.10 ("Gutsy Gibbon") easily via Update Manager.
Now, if you are a new user, you can have a look to see what I have done. It's easy to install in 7 steps.
So, after 28 minutes (from 18:59 to 19:27) Gutsy Gibbon is ready on my old notebook (CPU 1.3G). It's nice to see a world of free open sources.
While the developers' main focus lies on finishing KDE 4.0, the stable 3.5 series remains the desktop of choice for the time being. It is proven, stable and well supported. The 3.5.8 release with its literally hundreds of bugfixes has again improved the users' experience. The main focus of improvements for KDE 3.5.8 is  The KDE Project today (October 16th, 2007) announced the immediate availability of KDE 3.5.8, a maintenance release for the latest generation of the most advanced and powerful free desktop for GNU/Linux and other UNIXes. KDE now supports 65 languages, making it available to more people than most non-free software and can be easily extended to support others by communities who wish to contribute to the open source project.
Read more
How to use Graphical Tool to Configure Network in Ubuntu
10:35 PM | How to, Networking, Ubuntu | 1 comments »Basically the network interfaces have been configured already during installation of Ubuntu Linux. However, if you are a new Ubuntu user, you should know a little bit about how to add or remove network devices on your Ubuntu box. This post is also useful for anyone who has a troubleshooting with network connection.
Open a Network-Admin Tool
System > Administration > NetworkYou will go to a "Network Setting" panel as the following screen. At the default mode, the first tab (Connections) is selected. This tab allows you to setup all network connections.
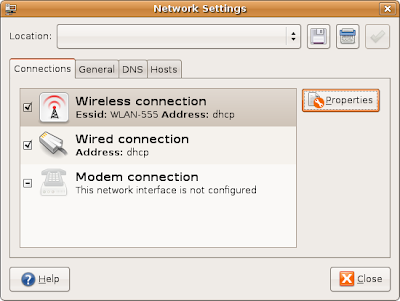 In this case, I have two different network cards. Both of wired and wireless network interfaces are currently configured for using DHCP address. Dynamic Host Configuration Protocol (DHCP) is a protocol used by networked client computers to obtain IP addresses and other parameters from a DHCP server.
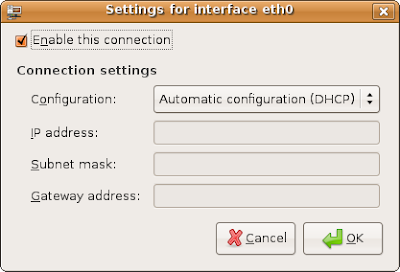
Now, I try to click on the second option "Wired Connection" and hit "Properties" button. Here, I can see that the check box has been sticked to mean that "This connection has been configured" for interface eth0. From the drop-down list of configuration field in "Connection Setting" part I can identify what kind of IP address should be used for this connection (a static IP or a dynamic IP).
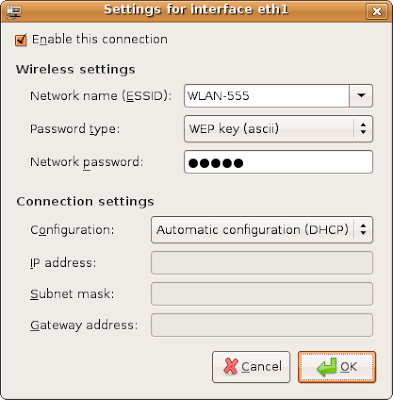
For the first option in "Network Setting" Panel is checked when we want to use a wireless connection. You have to make sure that your computer support for a wireless card to configure for this connection. The following screen shows that you have configured for your wireless network device as the interface eth1. This interface will be connected to a network named WLAN-555 with two parameters about password for network authorization.
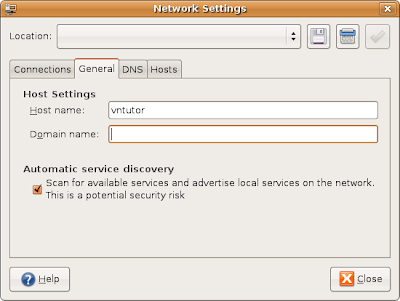
We continue with the second tab (General) in the "Network Setting". This part allows you to put a name and domain for your host as shown in the following picture.
The third tab can be used to identify a Domain Name System (DNS) which translates hostnames to IP addresses. This is needed for network devices in delivering information. Just click "Add" button and enter a new IP address of your DNS server and click "Delete" to remove an existing address from the available list.
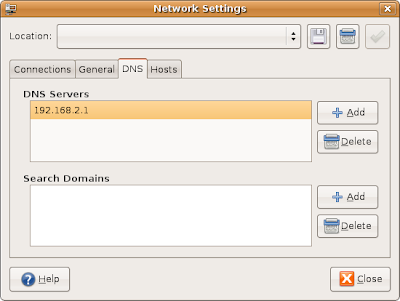 The remanding tab let you create aliases for local IP address on your computer. Look at some examples in the following pictures.
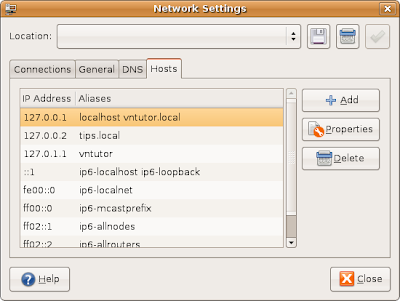 Hopefully, it is useful for you. Thank you for your reading.
VnTutor Read more!
VIM Commands Cheat Sheet v1.0 by VnTutor
11:57 PM | Kubuntu Gutsy, Tips - Tutorials, Ubuntu Gutsy, Ubuntu News | 0 comments »VnTutor have generated a VIM commands cheat sheet v1.0 for new VIM users. However, it is also needed professional for users as references. In this cheat sheet, commands with similar functions are grouped together. Print it out and stick it on your wall if possible!
This is a list of essential keyboard shortcuts for Linux Gnome. Please leave your messages for new ones!
Gimmie is a unique desktop organizer and panel replacement for the GNOME desktop environment. The easiest way is to use Gimmie is as a panel applet in the GNOME panel, but there is also a stand-alone version as well. Gimmie is even being considered for the next version of GNOME. In Ubuntu 7.10, the Gimmie panel applet is very simple to install.
read more | digg story
 sources.list is a package resource list used to locate archives of package distribution system. In Ubuntu, this control file is located in /etc/apt/sources.list to support APT for searching, updating, and installing packages. Each line is one separate source written in a given syntax.
You can customize this file by adding or removing any source you want. However, what is the problem if you are not sure how to modify it or currently your sources.list doesn't work well. You don't need to worry about that because you can use Ubuntu sources.list generator. With this generator you can create your own custom sources.list from various available sources. It takes only two simple steps. First, you select your country, Ubuntu version, and the architecture of your computer. Second, you take any repositories you like and click "Create sources.list" button to generate the content of your sources.list file. And I think that you know what to do then.

